Here we'll look at how digital images work, and in particular the code to manipulate them. (Hat tip to Mark Guzdial and Barbara Ericson for promoting the media computation idea of using images, sounds etc. to introduce computers.)
You see images on computers all the time. Here we will look behind the curtain, seeing how images are put together. What looks like a whole image to us, in the computer is a structure made of many little numbers.
Thematic Aside: this will echo a common theme in computer science -- what looks like an organic complicated whole, is "atomized" in the computer ... made up of a very large collection of very simple elements.
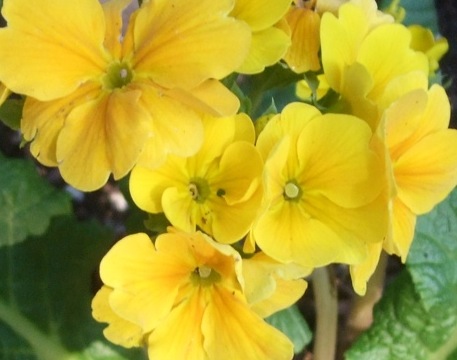
Here is an image of some yellow flowers:
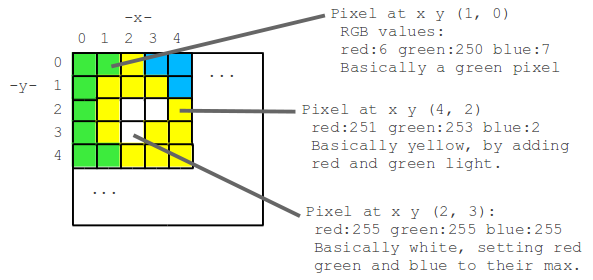
Zooming in on the upper left flower, we can see that it is actually made of many square "pixels", each showing one color:
![]()
What is the color of a pixel? The color of each pixel is made by mixing together red, green, and blue lights of various strengths. Each of the red, green and blue light levels is encoded as a number in the range 0..255, with 0 meaning zero light and 255 meaning maximum light. So for example (red=255, green=100, blue=0) is a color where red is maximum, green is medium, and blue is not present at all, resulting in a shade of orange. In this way, specifying the brightness 0..255 for the red, blue, and green color components of the pixel, any color can be formed. See: RGB explore.
The code we'll play with later on will not require an intuition about what blue=137 looks like. However, you will need to understand that any color can be made by combining the three color components.
Here are some example RGB values
Every pixel in the image is made with a mixture of red, green, and blue light. To see this, you can divide the original image into three color "channel" images, one for each color. Below is the flowers.jpg image followed by its three color channels. The red channel shows only the red light with green and blue stuck at 0, the next shows just the green light, and so on. Adding these three channels together yields the original image. Notice that the yellow flowers are bright in both the red and green channels. The green leaves pretty much only appear in the green channel. The blue channel is mostly near 0 everywhere, as the original image just does not have much blue in it.
The image "x.png" is very simple -- it's a very small black square with a white "x" at its center. Here it is: Our first image code example loads the "x.png" image and manipulates and prints it. Run the code to see what it does, and then we'll look at each line in detail.
Here's an outline of what this code does: the code loads the image "x.png" into a variable named "image". The image.setPrintScale(6); line sets an option for the image to print at 6x size which is useful for these very early examples where the code changes just one or two pixels. The image.getPixel(0, 0); line retrieves the pixel at (0, 0) and stores it in a "pixel" variable. The pixel.setRed(255) line changes the red value of that pixel to 255, overwriting the previous red value for that pixel. The pixel red/green/blue values are printed before and after the change, in the format "r:23 g:120 b:220".
For reference for later exercises, here is a list of all the functions we will use to manipulate images and pixels. You can ignore this for now, but you can come back to it for reference when working on code.
To see how Write code to set the top left pixel to purple.
Write code to set the top left pixel and the pixel below it to white.
The "stoplight" problem -- write code to set the top left pixel to red, the pixel below it to yellow, and the pixel below that to green.
Red diagonal -- write code to set the four pixels starting at the upper left going down and to the right all to red.
This exercise uses flowers-small.jpg, a smaller version of the flowers.jpg image. Set the red value of the upper left pixel to 255. The result is kind of a weak red. Why is that? Print the pixel values to explore why. How to fix it to be a strong, pure red? Write code to do that.
(goal count 5)
Restores each code text area above to contain the saved code
(you can preview the saved code with the Create Turn-In Text button above).
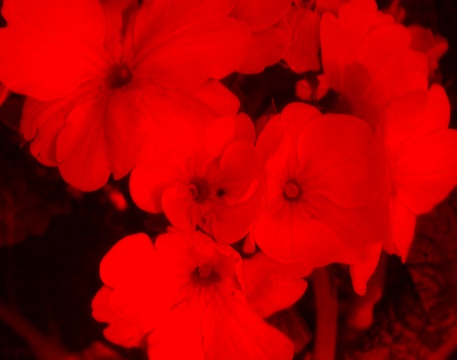
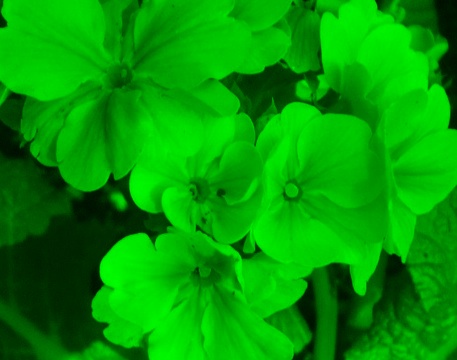
Image Code

Image Functions Reference
image = new SimpleImage("flowers.jpg");Set the variable "image" to hold the "flowers.jpg" image image.setPrintScale(5);Set the image to print at 5x size on screen. Useful for early to make single-pixel changes visible.
print(image);Print the image to the screen.
pixel = image.getPixel(0, 0);Retrieve the pixel at x,y (0, 0) and store it in a "pixel" variable (i.e. the upper left pixel). print(pixel);Print the values for one pixel, in the format "r:200 g:12 b:166"
pixel.setRed(255);Change the pixel's red value to be 255 (we can specify any value 0..255 within the parenthesis). There are analogous functions pixel.setGreen(n) and pixel.setBlue(n) for the other two colors. If the argument value is outside the range 0..255, it is automatically limited to 0 or 255. red = pixel.getRed();Retrieve the red value from a pixel (a number in the range 0..255), and store it in a variable "red". There are analogous functions pixel.getGreen() and pixel.getBlue(). image.getWidth(), image.getHeight()Retrieve the width and height of an image. image.resize(width, height);Scale an image up or down in size so it has the given width and height. Code Examples
image.getPixel(x, y) and pixel.setRed(n) etc. work, try adding and running run code above for each of the problems below (solutions are available).
Example Problems Solution Set the top left pixel to be green.
Set the top left pixel to be yellow.
Set the top left pixel to be dark yellow -- set the necessary colors to 150 instead of 255.
Set the top left pixel to white. How to set it to black?
Q: what is the x,y coordinate of the pixel to the right of the top left pixel? Set the top left pixel to yellow and the pixel to its right to red.
Set the top left pixel to blue and the pixel below it to purple.
Set the top left pixel to red and the pixel diagonally down and to the right to green.
Image Code Exercises
Exercise 1
Exercise 2
Exercise 3
Exercise 4 (optional)
Exercise 5 (optional)
Turn In
This retrieves the saved code (saved by the Run/Save button)
and displays it below for copy/paste. Copy the code text,
fill in your name (and your parter's) and any README notes
for the grader. Paste it into a file named like "homework6.txt"
and submit that file. You can also use this feature to get your code
back if you mess it up (but have not clicked the Run/Save button).